Open ESP32 Gadgets

A guide to the new generation of open, programmable devices that look like consumer electronics but put you in control of the entire stack.


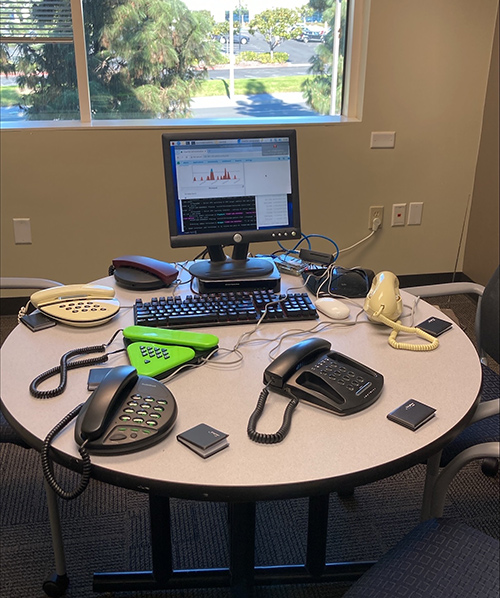
For years, the ESP32 was just another microcontroller on a bare circuit board — something you plugged into a breadboard and programmed with blinking LED tutorials. That era is over.

Today, companies like Espressif, LILYGO, M5Stack, Elecrow, and Seeed Studio produce devices built around ESP32 chips that look like smartwatches, smartphones, cyberdecks, and smart speakers. They have touchscreens, batteries, cameras, microphones, and wireless radios. They ship in enclosures. Some of them could pass for finished consumer products.

But they aren’t consumer products. They’re something new.

We’re calling them Open ESP32 Gadgets: small, self-contained devices built around Espressif chips that resemble familiar consumer electronics but remain fully programmable and developer-accessible. No locked-down OS. No cloud account required. No subscription. You control the firmware, the networking, the interface, and the hardware behavior.

This is the guide to what they are, what you can build with them, and why they matter right now.


What Makes Something an Open ESP32 Gadget?

  • Familiar form factor. It looks like a device you’d recognize — a watch, a phone, a speaker, a handheld console.
  • Finished or semi-finished hardware. It ships with an enclosure, display, battery, or other components beyond a bare PCB.
  • Fully programmable. The firmware is open and modifiable using tools like Arduino, ESP-IDF, or PlatformIO.
  • Wireless connectivity. Wi-Fi and Bluetooth are built in. Many newer devices add LoRa, Thread, or Zigbee.
  • No cloud dependency. These devices can operate entirely locally — on your network, with your server, under your control.

In other words, they look like gadgets but behave like open development platforms.


The Gadget Taxonomy

The ESP32 ecosystem now spans at least 18 distinct device form factors that mirror familiar consumer electronics. Here’s what exists.

Smartwatch

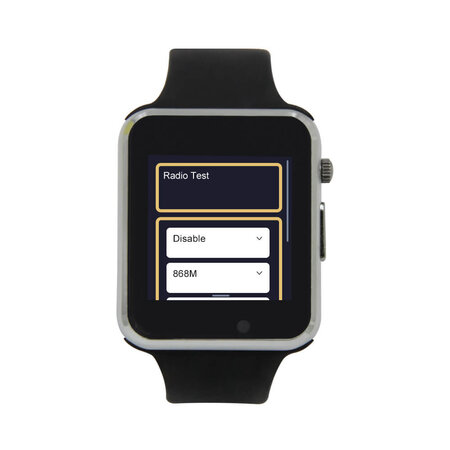
Wearable devices with small displays, sensors, and BLE connectivity.

Examples: LILYGO T-Watch S3, M5StickC Plus2 watch kit

What people build:

  • Fitness trackers
  • Sensor dashboards
  • Notification monitors
  • BLE remote controls

Smartphone

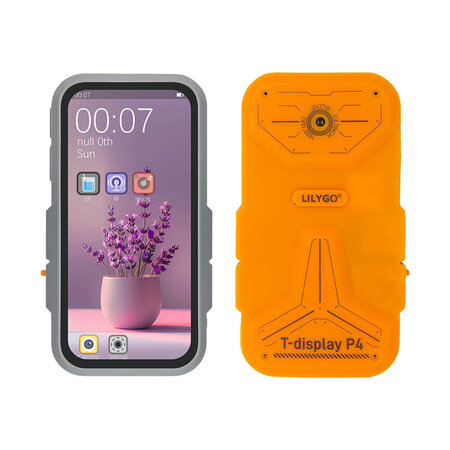
Phone-shaped handheld computers with touchscreens, cameras, and multiple radios.

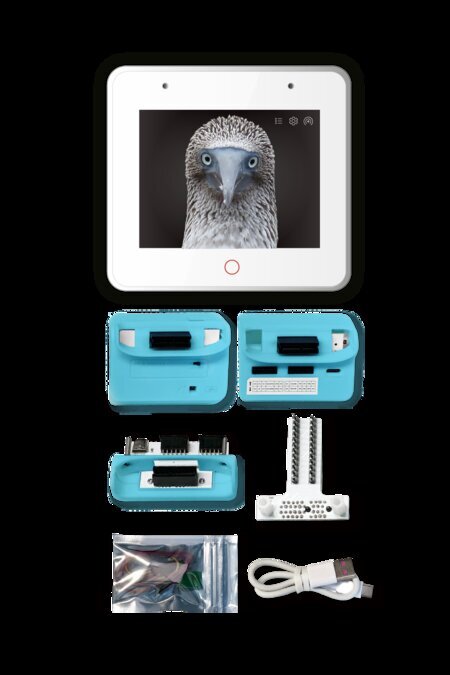
The T-Display P4 is one of the most interesting new devices in the ecosystem. It combines an ESP32-P4 (dual-core RISC-V at ~360 MHz), an ESP32-C6 for wireless, an optional LoRa transceiver, a 4-inch touchscreen, a camera, microphone, speaker, headphone jack, and microSD slot — all in a device roughly the size of a smartphone.

Examples: LILYGO T-Display P4

What people build:

  • Music players
  • LoRa communicators
  • Portable terminals
  • Field data collectors
  • Handheld radio tools

Tablet

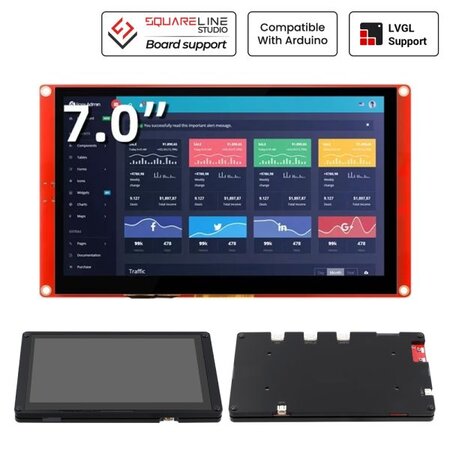
Portable touchscreen devices with larger displays, typically battery-powered.

Examples: Elecrow CrowPanel 7″, CrowPanel Advance 7″ ESP32-P4, CrowPanel Advance 10.1″ ESP32-P4

What people build:

  • DIY GPS navigators (with an external GNSS module and self-hosted OpenStreetMap tiles)
  • Home automation controllers
  • Industrial dashboards
  • Portable instrumentation displays
  • Robotics control interfaces
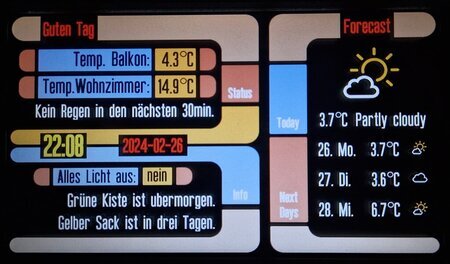
Desk Smart Display

Touchscreen devices designed to sit on a desk or stand. Think of these as the modern equivalent of a digital photo frame, but programmable.

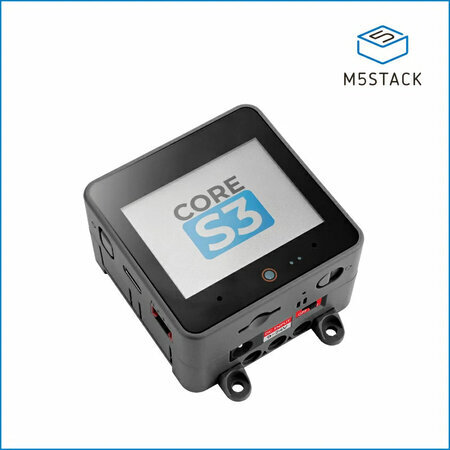
Examples: ESP32-S3-BOX-3, M5Stack CoreS3, Elecrow CrowPanel 5″

What people build:

  • Smart home dashboards
  • Weather stations
  • IoT device monitors
  • Voice assistant consoles
  • Calendar/clock displays

Smart Speaker

The open-source answer to the Amazon Echo, Google Home (now Google Nest), and Apple HomePod. These are stationary, always-on, plugged-in devices that sit on a counter or shelf — microphone arrays, decent speakers, and a constant network connection. The commercial versions are tied to Alexa, Google Assistant, or Siri — and by extension, to those companies’ cloud services, data collection, and ecosystem lock-in.

An ESP32 smart speaker runs locally. Voice processing can happen on-device or on your own server using the Wyoming Protocol — Whisper for speech-to-text, Piper for text-to-speech, all on your network. No wake word gets sent to a corporate cloud. No conversation history gets stored on someone else’s infrastructure.

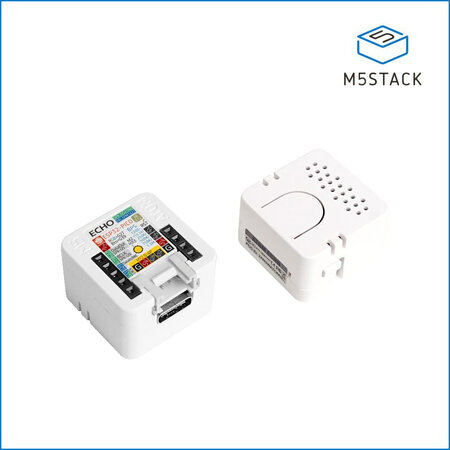
The category also includes smaller “voice satellite” devices — tiny modules like the Atom Echo that act as remote microphone/speaker endpoints for a central Home Assistant server. Scatter a few around the house and you have whole-home voice control without buying a single Amazon or Google device.

Examples: ESP32-S3-BOX-3, Atom Echo

What people build:

  • Offline voice assistants
  • Home automation voice controllers
  • Audio streamers
  • Intercom terminals
  • Voice satellite nodes for whole-home coverage
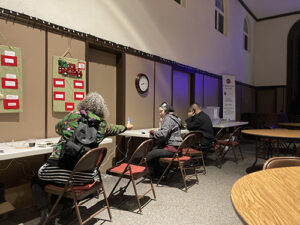
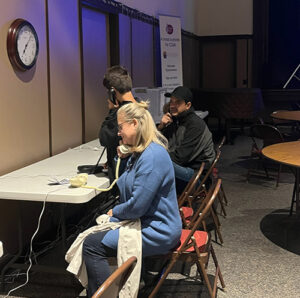
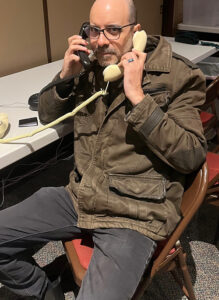
Voice Terminal

The portable, battery-powered counterpart to the smart speaker. Where a smart speaker is stationary and always listening from a shelf, a voice terminal is something you carry with you or pick up when you need it — a handheld device with a microphone, speaker, a button, and not much else.

The typical workflow: press the button, speak your question, and the device streams your audio over Wi-Fi to a local server. The server runs speech-to-text (Whisper), sends the transcribed text to a local LLM (like Ollama running Llama or Mistral), and streams the response back as synthesized speech (Piper). The device speaks the answer. The entire round trip stays on your network — no cloud API calls, no data leaving your house.

This is essentially a Star Trek communicator for your home server. Press, talk, get an intelligent answer, done.

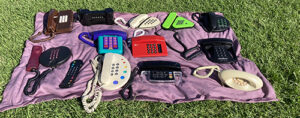
This is an emerging category. If you followed the launches of the Humane AI Pin and Rabbit R1 in 2024 — both widely criticized for being overpriced, cloud-dependent, and subscription-locked (MKBHD called the AI Pin “the worst product I’ve ever reviewed”) — you’ve seen the concept done badly. The idea of a small, portable device you talk to and get intelligent answers from isn’t wrong. The execution was: closed firmware, mandatory cloud, $24/month subscriptions, and hardware you couldn’t repurpose when the company pivoted. The open-source ESP32 versions solve all of that by running against your own infrastructure.

The hardware is still maturing. There’s no single dominant “buy this open voice puck” product yet, but several projects and devices are converging on the form factor:
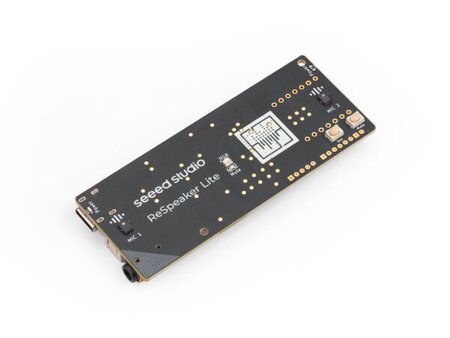
What people build:

  • Portable AI voice interfaces (press-to-talk LLM interaction)
  • Handheld intercoms
  • LoRa voice communicators
  • Wearable voice command devices
  • Home automation voice remotes
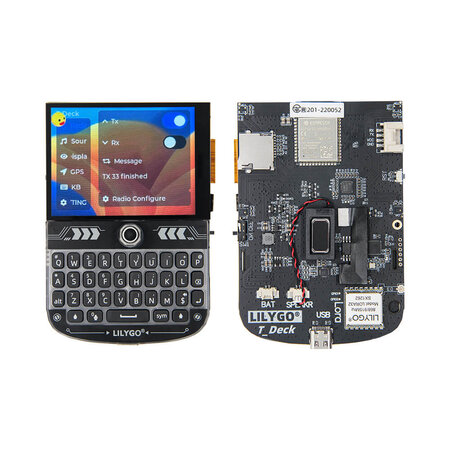
Cyberdeck

Small keyboard-equipped handheld computers — the closest thing to a pocket Linux terminal in microcontroller form. If you’re old enough to remember two-way pagers like the Motorola Talkabout T900 or the early BlackBerry devices from the early 2000s, these will feel familiar: a small screen, a tiny keyboard, wireless connectivity, and the ability to send and receive messages from your pocket. The difference is that a cyberdeck is fully programmable and not tied to a paging network or carrier.

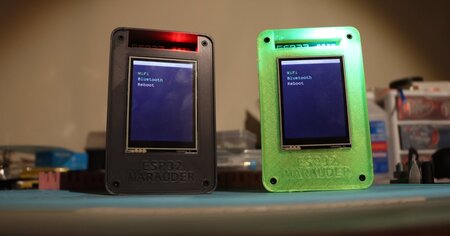
This form factor has also become the home of a thriving hacker tool scene, largely inspired by the Flipper Zero. Tindie — the indie hardware marketplace — is full of ESP32-based pentesting and security research devices that take the concept further: Wi-Fi and Bluetooth auditing tools, RFID readers, sub-GHz radio analyzers, and more, all packed into pocket-sized handhelds. Projects like ESP32 Marauder (a Wi-Fi/Bluetooth penetration testing suite), Bruce Cardputer (an M5Stack Cardputer pre-flashed with the BRUCE pentesting firmware), and CapibaraZero (an open-source firmware that turns off-the-shelf ESP32-S3 hardware into a Flipper Zero alternative with Wi-Fi, BLE, NFC, BadUSB, sub-GHz, and IR) show what happens when cheap open hardware meets a community of security researchers. Many of these devices cost $30–$60 — a fraction of the Flipper Zero’s $169 — and are fully open source.

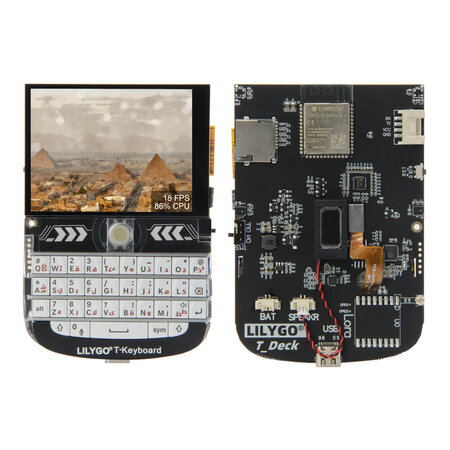
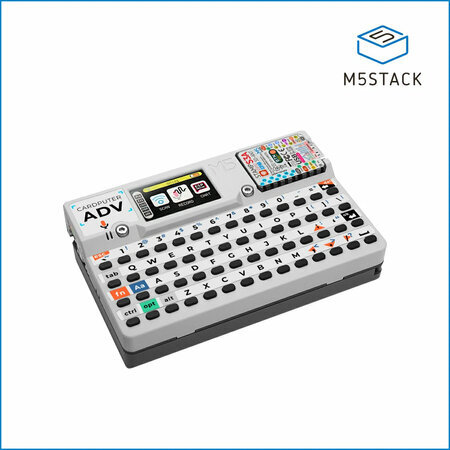
Examples: LILYGO T-Deck, M5Stack Cardputer, Bruce T-Embed

What people build:

  • Portable programming terminals
  • SSH clients
  • Network diagnostics consoles
  • Wi-Fi/Bluetooth pentesting toolkits
  • RFID and sub-GHz security research tools
  • Hacking toolkits in the spirit of Flipper Zero

Handheld Console

Retro-style gaming handhelds that typically look like a Game Boy — portrait orientation, d-pad, a couple of face buttons, and a small screen. Devices like the ESPlay Micro and various ODROID-GO derivatives fit this mold. Even the Retroflag GPi case — designed for a Raspberry Pi Zero — nails the Game Boy aesthetic so well it’s worth mentioning here, even though it’s not ESP32-based. If you want something wider and more ergonomic — a PSP or Steam Deck-style landscape layout with grip handles — that’s mostly DIY territory for now: 3D-printed enclosures and custom PCBs. No major ESP32 vendor sells one off the shelf in that form factor yet, but the community builds them.

Either way, the same form factor works for much more than games.

What people build:

  • Retro gaming / emulator platforms (Game Boy, NES, Sega Master System)
  • Wireless hacking toolkits and network scanners
  • Educational programming toys
  • Chiptune music tools
  • RF experimentation platforms

The crossover between gaming console and hacking toolkit is strong here. A device with a screen, buttons, battery, and wireless radios is essentially a portable digital multitool — similar in spirit to a Flipper Zero, but built on open hardware.

Walkie-Talkie

Portable radio-style devices with LoRa or mesh networking. Worth noting: most of these are text-based messengers, not voice radios. LoRa’s bandwidth is too low for real-time audio. They’re walkie-talkies in spirit — small, handheld, push-to-communicate devices — but the messages are text, GPS coordinates, or sensor data rather than speech. The form factor and the use case (field communication without infrastructure) are the same; the medium is different.

Some of these devices have their own screens and can operate standalone, but many — particularly Meshtastic nodes — are designed to pair with a smartphone running a dedicated app. The phone provides the typing and reading interface; the ESP32 device handles the radio. Think of it as a modem in your pocket.

Examples: Elecrow ThinkNode M2, ThinkNode M5, LILYGO T-Deck

Elecrow’s ThinkNode line is one of the most complete Meshtastic product families from a single vendor. The M2 ($21.90) is a pocket-sized ESP32-S3 node with a 1.3″ OLED display — one of the cheapest ways to get on a mesh network. The M5 adds a larger 1.54″ screen and GPS. They also make a solar-powered outdoor node (M6), a GPS tracker card (M3), and CrowPanel Advance displays pre-configured for Meshtastic with full touchscreen interfaces.

What people build:

  • LoRa text messengers
  • Meshtastic mesh network nodes
  • Emergency communicators
  • GPS position beacons

Remote Control

Small handheld devices with buttons, tiny screens, and wireless connectivity.

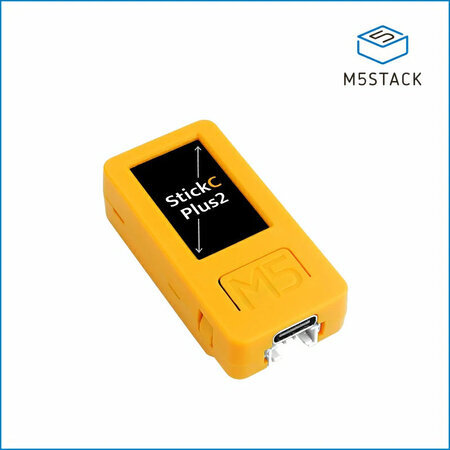
The M5StickC Plus2 is the Swiss Army knife of this category — a tiny ESP32-based stick with a 1.14″ LCD, two buttons, an IR transmitter, a 6-axis IMU, and a battery, all in a case the size of a lighter. It’s cheap (~$20), pocketable, and versatile enough that people use it as everything from a TV remote clone to a BLE beacon trigger to a portable sensor readout. M5Stack also sells snap-on sensor hats that extend it without soldering.

The CrowPanel Rotary Display takes a different approach — a 1.28″ round IPS touchscreen built into an aluminum knob with an ESP32-S3. It combines rotation (clockwise/counterclockwise), a press action, and capacitive touch on the screen itself. Think of a programmable Nest thermostat dial: turn it to adjust volume, temperature, or lighting levels; tap the screen to switch modes; press to confirm. At $29 with Wi-Fi, BLE, and LVGL support, it’s a physical controller that can talk to Home Assistant or any MQTT broker on your network.

Examples: M5StickC Plus2, Elecrow CrowPanel 1.28″ Rotary Display

What people build:

  • Home automation remotes
  • IR learning remotes
  • Media controllers
  • Smart home dial controllers (volume, lighting, thermostat)
  • Device configuration tools

Security Camera

ESP32 devices with integrated camera modules. Out of the box, these don’t look like security cameras — they’re tiny bare circuit boards with a camera module soldered on. The ESP32-CAM is barely larger than a postage stamp. The ESP32-S3-EYE adds an LCD and microphone but is still an exposed dev board.

What turns them into security cameras (or dash cams, or wildlife cams) is the enclosure. There’s a thriving ecosystem of 3D-printable cases on Printables, Thingiverse, and MakerWorld — everything from wall-mount housings with ball joints to dummy security camera shells that the board drops into. The form factor is whatever you make it. The board just provides the camera, Wi-Fi streaming, and optional motion detection or face recognition.

Examples: ESP32-CAM, ESP32-S3-EYE

What people build:

  • DIY surveillance cameras
  • Dash cams
  • Wildlife / trail cameras
  • Machine vision sensors
  • Robotics vision modules
  • 3D printer monitors

Wall Panel / Smart Mirror

These are two variations on the same idea: a flat, wall-mounted touchscreen that displays information and controls your home. The difference is cosmetic.

A wall panel looks like what it is — a visible screen mounted to the wall, usually in a frame or flush-mount bracket. Think of a tablet permanently attached next to a light switch. It’s obviously a piece of technology.

A smart mirror hides the screen behind two-way glass. When the display is off, it looks like an ordinary mirror. When it’s on, information appears overlaid on your reflection — time, weather, calendar, notifications. Capacitive touch panels work through thin two-way glass, so it can be interactive without looking like a screen. No dedicated smart mirror dev kit exists yet, which makes this one of the few form factors still assembled entirely from generic parts.

Under the hood, both run the same software, use the same ESP32 boards, and serve the same purpose. One is visible technology; the other is technology disguised as furniture.

Examples: Elecrow CrowPanel Advance 5″, CrowPanel Advance 7″ ESP32-S3

Elecrow’s CrowPanel Advance line is well suited here — 5″ and 7″ IPS touchscreens with ESP32-S3, LVGL support, and enough resolution (800×480) for a usable home automation interface. Mount one next to a light switch running a Home Assistant dashboard and it replaces a commercial wall panel at a fraction of the cost.

What people build:

  • Smart home wall controllers
  • Alarm panels
  • Building automation displays
  • Room scheduling panels
  • Weather and calendar displays
  • Notification centers

Smart Clock

Small desktop devices with a display, Wi-Fi, and usually a speaker — essentially a bedside or desk companion. Think of the consumer smart clocks that have become popular in recent years: the Amazon Echo Spot, the Lenovo Smart Clock, or the Google Nest Hub used as a nightstand clock. The ESP32 version does the same job — shows the time, weather, sensor readings, notifications — but you control what it displays and where the data comes from.

These tend to be some of the simpler ESP32 builds, which makes them a good entry point for someone’s first Open ESP32 Gadget project. E-paper is a natural fit here — always-on, zero power draw when static, readable in daylight. Elecrow’s CrowPanel e-paper line ranges from 1.54″ to 5.79″, all ESP32-based, starting around $11. A 4.2″ e-paper display on a nightstand showing the time, weather, and your calendar is a compelling alternative to a glowing LCD.

What people build:

  • Alarm clocks with custom displays
  • Environmental monitors (temperature, humidity, air quality)
  • Calendar and agenda displays
  • Notification centers
  • Pomodoro / productivity timers

IoT Cube

The smallest form factor in the taxonomy. The M5Stack Atom is just 24 x 24mm, roughly the size of a quarter, and designed to disappear into your environment. No screen to speak of (maybe a 5×5 RGB LED matrix or a single status LED), no keyboard, no pretense of being a handheld device. They’re nodes. You place them around your house, your workshop, your office, and they quietly do one thing well.

The M5Stack Atom series is the most developed product line here, with variants for different use cases: the Atom Lite (bare bones, just Wi-Fi and a button), the Atom Matrix (adds a 5×5 LED grid and IMU), the Atom Echo (adds a microphone and speaker for voice), and the Atom SPK (audio output). Each one plugs into M5Stack’s ecosystem of snap-on sensor bases — PIR motion, temperature/humidity, relay switches, GPS, NFC readers — so you can assemble a purpose-built node without soldering.

These are the devices that make the “home server as hub” architecture work at scale. A single Home Assistant instance might talk to a dozen Atom nodes scattered around the house — one monitoring temperature in the garage, one listening for a wake word in the kitchen, one acting as a doorbell, one triggering automations via NFC on your desk. An IoT cube with an NFC reader is a particularly elegant example: tap a card to trigger a light scene, start a playlist, run a script, or arm an alarm. The cube becomes a physical command interface — programmable buttons without the buttons. Each card is a different macro.

Examples: M5Stack Atom Lite, Atom Matrix, Atom Echo

What people build:

  • NFC command terminals (each card triggers a different automation)
  • Voice satellites for Home Assistant
  • Motion / presence sensors
  • Environmental monitors (temperature, humidity, air quality)
  • Smart doorbells
  • BLE beacons
  • Automation trigger devices
  • IR blasters for controlling legacy AV equipment

LED Ticker

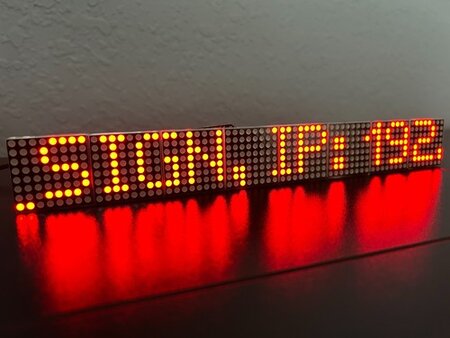
Scrolling LED message signs — the kind you see in shop windows, radio studios, and transit systems.

LED tickers are one of the few gadget types that smartphones never absorbed. Ambient signage still needs a dedicated device, and ESP32 hardware makes it programmable.

What people build:

  • News/RSS tickers
  • Radio station now-playing displays
  • IoT event stream monitors
  • Stock/sensor tickers
  • Digital art installations

Why This Category Exists

Four things about ESP32 hardware created this ecosystem:

Built-in wireless. Every ESP32 includes Wi-Fi and Bluetooth. Newer variants add Thread, Zigbee, and 802.15.4. This makes every device network-capable by default.

Low cost. ESP32 chips cost $2–$6. This is cheap enough that manufacturers can build complete gadgets — with screens, batteries, and enclosures — and sell them as dev kits at accessible prices.

Strong display support. ESP32 chips have excellent support for SPI displays, parallel RGB panels, touch controllers, and UI frameworks like LVGL. This makes screen-based gadgets practical on microcontroller hardware.

Integrated peripherals and enclosures. This is the one that really changed things. Traditionally, adding a screen, microphone, speaker, or battery to a microcontroller project meant sourcing individual components, soldering them together, figuring out pin assignments, and designing or 3D-printing an enclosure. Each add-on was a friction point that could kill a project before it got interesting. Devices like the M5Stack Core, ESP32-S3-BOX, LILYGO T-Display, and Elecrow CrowPanel ship with all of that already done — screen attached, mic and speaker wired, battery management built in, enclosed in a case. You open the box, flash firmware, and you have a working gadget. The hardware integration that used to take days of soldering and troubleshooting now takes zero effort, which means more people actually finish their projects.

Other Platforms in the Open Gadget Space

ESP32 dominates the gadget-style form factors, but other platforms overlap with this category — and in some cases are better suited for specific builds.

Raspberry Pi / Pi Zero W is the most obvious neighbor. A Pi Zero W is a full Linux computer the size of a stick of gum, with Wi-Fi, Bluetooth, HDMI output, USB, and a camera connector — all for around $15. It runs a real operating system, which means it can do things an ESP32 can’t: serve web applications, run Docker containers, handle video encoding, or act as a full desktop. Smart mirrors are often built on Raspberry Pi rather than ESP32, because driving a large display with a browser-based UI is more natural on Linux. The Pi is also the backbone of many retro gaming handhelds (RetroPie), media players (Kodi), and home servers. The tradeoff is power consumption and boot time — a Pi needs more battery and takes seconds to start, while an ESP32 wakes instantly and sips power.

Arduino is where the maker movement started, and it still has a massive ecosystem of shields, sensors, and community projects. Newer boards like the Arduino Nano ESP32 (which is actually ESP32-based) and the Arduino MKR family add wireless connectivity. But most classic Arduino boards lack built-in Wi-Fi and have limited RAM and processing power, so they tend to appear in simpler projects — sensor nodes, motor controllers, basic displays — rather than screen-heavy gadgets. Arduino is more likely to be the brains inside a custom device than the platform for a finished-looking gadget.

Raspberry Pi Pico / RP2040 occupies a middle ground. The Pico W added Wi-Fi, making it more competitive with ESP32 for IoT projects. The RP2040 chip shows up in some gadget-style devices — the Pimoroni Badger 2040 (an e-ink conference badge) and the Pimoroni PicoSystem (a tiny gaming handheld) are good examples. But the ecosystem of ready-made gadget enclosures and form factors is much smaller than ESP32’s.

Nordic nRF52 is strong in wearables. The PineTime smartwatch runs on an nRF52832 and is one of the most polished open-source watch projects. Nordic chips excel at low-power Bluetooth applications but generally lack Wi-Fi and the display/audio support that ESP32 offers.

Teensy is a powerhouse for audio and real-time applications — synthesizers, MIDI controllers, audio processors — but it lacks built-in wireless and doesn’t have an ecosystem of gadget-shaped dev kits.

The open gadget idea isn’t exclusive to any one chip. But ESP32 has the widest selection of ready-to-use devices in recognizable consumer form factors, which is why it anchors this guide. Many of the best builds combine platforms — an ESP32 voice terminal talking to a Raspberry Pi running Home Assistant, or an Arduino sensor node feeding data to an ESP32 desk display.


Why Open ESP32 Gadgets Matter Now

You Control the Entire Stack

Modern consumer electronics are closed systems. Your smart speaker needs a cloud account. Your smartwatch sends data to a corporate server. Your home automation panel stops working when the company shuts down its service.

Open ESP32 Gadgets put the entire stack back under your control:

  • The firmware is yours to write and modify
  • The networking runs on your terms — local Wi-Fi, your own server, your VPN
  • The data stays where you put it
  • The device keeps working as long as the hardware does

No subscription. No third-party server. No planned obsolescence through software updates you didn’t ask for.

Local-First by Default

Many ESP32 gadgets are designed to work entirely offline or within a local network. A smart display can control your home automation through a local MQTT broker. A LoRa walkie-talkie communicates peer-to-peer with no infrastructure at all. A GPS navigator can pull map tiles from your own NAS over a VPN.

This local-first design is increasingly attractive as people deal with privacy concerns, cloud service shutdowns, and the realization that “smart” devices often stop being smart when a company changes direction.

The Home Server as the Hub

What ties all of these gadgets together is the server they talk to — and that server can be yours.

A growing number of people run home servers on a NAS, a Raspberry Pi, or an old PC. The software stack is open source and mature:

  • Home Assistant is the center of gravity. It’s an open-source home automation platform that runs locally and integrates with hundreds of device types, including ESP32 hardware through ESPHome. Your smart clock, wall panel, voice terminal, and desk display can all report to and be controlled by a single Home Assistant instance running in your house. No cloud account required.
  • Wyoming Protocol solves voice. It’s an open protocol that Home Assistant uses for speech-to-text and text-to-speech, allowing voice terminals and smart speakers to process speech entirely on your local network. Your ESP32 voice terminal sends audio to a Wyoming-compatible server (like Whisper for STT and Piper for TTS) running on your home hardware. The wake word, the transcription, and the response all stay on your network — nothing leaves your house.
  • MQTT is the messaging layer. Lightweight enough for microcontrollers, it lets ESP32 devices publish sensor data and receive commands through a local broker like Mosquitto. Your IoT cubes, smart clocks, and sensor nodes can all communicate through MQTT without touching the internet.
  • Self-hosted services fill in the rest. Map tiles served from OpenStreetMap data on your NAS. Media streamed from Jellyfin. DNS filtering through Pi-hole or AdGuard Home. Each ESP32 gadget becomes a client to infrastructure you own.

And none of this has to stay inside your house. VPN services like Tailscale or WireGuard let your gadgets reach your home server from anywhere — securely, without opening ports or relying on a third party’s cloud relay. Your ESP32 smartphone can pull Home Assistant dashboards over Tailscale while you’re on the road. Your LoRa GPS tracker can relay positions to your server through a gateway on your home network. Your cyberdeck can SSH into your machines from a coffee shop.

The result is a personal technology stack: open-source gadgets talking to an open-source server over an encrypted tunnel, with every layer controlled by you. It’s the opposite of the consumer electronics model, where each device phones home to a different company’s cloud.

The Vibecoding Era

Perhaps the most important shift: AI-assisted programming has dramatically lowered the barrier to building custom devices.

Someone who has never written embedded firmware can now describe what they want — a LoRa messenger, a sensor dashboard, a voice-controlled automation terminal — and use tools like Claude Code, OpenAI Codex, Google Gemini CLI, or GitHub Copilot to generate working code for an ESP32 platform.

This changes the equation completely. The hardware is cheap and available off the shelf. The software can be generated and iterated on conversationally. The result is that anyone with an idea can build a purpose-built device that does exactly what they need.

We’re moving from buying a device and adapting to its limitations to building a device that fits your specific use case.

Part of a Bigger Movement

Open ESP32 Gadgets don’t exist in a vacuum. They’re the latest expression of something people have been doing for decades: taking control of their own hardware.

PC building established the template. Starting in the 1990s, people rejected the idea that a computer had to come as a sealed box from Dell or Compaq. You picked your own motherboard, CPU, GPU, RAM, and case. You chose your own operating system. The machine was yours — not just something you bought, but something you understood and assembled. PC building proved that ordinary people would choose modularity and control over convenience, given the option.

The maker movement expanded that ethos beyond the desktop. Arduino put microcontrollers in the hands of artists, designers, and hobbyists who had never written embedded code. 3D printers made custom enclosures possible. Raspberry Pi turned a $35 board into a home server, media center, or retro gaming console. Hackerspaces and Maker Faires built communities around the idea that building your own technology wasn’t just for engineers — it was for anyone willing to learn.

Open ESP32 Gadgets are where these threads converge. The maker movement gave people the skills and confidence to build hardware. PC building culture normalized the idea of assembling your own devices from components. And now ESP32 hardware provides something neither movement had before: cheap, wireless, display-equipped platforms that look and feel like finished consumer devices while remaining completely open.

The difference is that you’re no longer building a computer that sits on a desk or a one-off Arduino project wired together on a breadboard. You’re building a watch. A phone. A walkie-talkie. A smart speaker. Devices that go in your pocket, hang on your wall, or sit on your nightstand — devices that replace the closed consumer electronics you used to have no alternative to.


A Historical Echo

In the late 1990s and early 2000s, people carried a collection of specialized electronic devices:

  • PalmPilot (PDA)
  • iPod (music player)
  • Garmin (GPS navigator)
  • Game Boy (handheld console)
  • Motorola FRS radio (walkie-talkie)
  • Sony Cyber-shot (digital camera)
  • BlackBerry (communicator)

The smartphone absorbed nearly all of them into a single device.

Now a similar diversification is happening again. The ESP32 ecosystem is re-creating many of those specialized device forms — watches, phones, consoles, communicators, cameras, displays — but with a fundamental difference:

Instead of buying closed devices from manufacturers, people build personalized open gadgets that do exactly what they want.

It’s a return to the spirit of early personal computing, when the whole point was that you could make the machine do whatever you imagined. The difference today is that the hardware costs a few dollars, and an AI can help you write the code.


The Full Taxonomy

Form FactorExample DevicesKey Applications
SmartwatchT-Watch S3Fitness tracker, sensor dashboard, notifications
SmartphoneLILYGO T-Display P4Music player, LoRa communicator, portable terminal
TabletCrowPanel 7″, CrowPanel Advance 10.1″ ESP32-P4DIY GPS, industrial dashboard, automation controller
Desk Smart DisplayESP32-S3-BOX-3, M5Stack CoreS3Smart home dashboard, weather station, voice assistant
Smart SpeakerESP32-S3-BOX-3, Atom EchoOffline voice assistant, intercom, voice satellite
Voice TerminalReSpeaker LitePortable AI voice interface, handheld intercom
CyberdeckLILYGO T-Deck, M5Stack CardputerSSH terminal, network diagnostics, hacking toolkit
Handheld ConsoleESPlay Micro V2Retro gaming, hacking toolkit, RF experimentation
Walkie-TalkieThinkNode M2, T-Deck MeshtasticMeshtastic, mesh messaging, emergency comms
Remote ControlM5StickC Plus2, CrowPanel 1.28″ RotaryHome automation, IR remote, media controller, smart dial
Security CameraESP32-CAMSurveillance, wildlife cam, machine vision
Wall Panel / Smart MirrorCrowPanel Advance 5″, CrowPanel Advance 7″Home automation, alarm panel, calendar, notifications
Smart ClockCrowPanel 1.28″ Round, CrowPanel E-Paper seriesAlarm clock, environmental monitor, notification center
IoT CubeM5Stack Atom, Atom EchoNFC command terminal, voice satellite, sensor node
LED TickerESP32 + LED matrixNews ticker, now-playing sign, IoT event display

Open ESP32 Gadgets are not consumer electronics and not traditional dev boards. They’re something in between — programmable devices in familiar shapes, built on open hardware, running open software, controlled entirely by the person who owns them. In an era of cloud-dependent, subscription-driven, closed-source consumer gadgets, that’s a category worth naming.

Voices on the Line at Wilshire Online for Dead Media Chat Room Symposium, Sunday March 1st

“Voices on the Line” will be at 6135 Wilshire Blvd, Los Angeles, Ca on Saturday March 1st, 2026 from 11am to 6pm as part of the Dead Media Chat Symposium hosted by writer and artist Claire Evans at this event, Expo 26. The venu is also known as Wilshire Online which is abandoned offices which have been taken over by art galleries. It is next door and run by some of the same people as Barry Magee’s 99 Cent Store installation at 6121 Wilshire and Sizzler gallery at 6145 Wilshire. This is all in conjunction with Art Fair Week here in LA with Frieze and Felix being the main two. Many other satellite airs are seeking to attract similar audiences. The phone will be set up in a conference room in the office space. AI’ll also bring dead media to add to the vibe (2 inch tapes, 1/4 inch tapes, hi8 video tapes, DAT tapes, DVD-RAM discs, VHS tapes, 8 track carts, CDR spindle, and 78s.


View this post on Instagram


A post shared by ₠ (@clairelevans)


View this post on Instagram


A post shared by Wilshire Online (@wilshireonline)


View this post on Instagram


A post shared by ARTILLERY (@artillery_mag)


View this post on Instagram


A post shared by @grantedwardtyler

Voices on the Line: A Retro Telephone Experience

A collection of vintage analog telephones sit together, on a table in a room, or on a blanket in a park. Wires connect them to each other, but there’s no phone company, no line running to the wall. Pick up a receiver and there’s a dial tone anyway.

A little black book sits beside the phones with listed numbers. Extensions leading to recorded speeches, songs about phone calls, stories about the way phone systems used to work, voices from decades past. Some extensions are unlisted. Some you find by accident. Dial 411 and see where it takes you. Or figure out how to call the other phones (there’s a clue in the little black book) and find yourself connected to a stranger sitting ten feet away.

OC Arduino and Raspberry Pi Meetup


Something happens when people approach the phones. Some visitors need no prompting. They see the phones, they see the little black book, and they sit down and start dialing. These tend to be people who grew up with analog telephones, people who remember when a phone was a thing you held and a number was something you memorized. Once they pick up and hear a voice on the other end, they stay. They’re also often happy to help younger visitors figure it out, and the piece becomes a moment where one generation passes down a small bit of lost knowledge to the next.

Obsolete Technology as a Medium

There’s a growing conversation happening right now around obsolete technology as an artistic medium. Artists are finding that the tools we’ve discarded still have something to say.

Archaic media formats become the subject of symposiums. Artists and collectives are making the relationship between people and obsolete machines the center of their work. Archivists and artists are sitting at the same table, asking similar questions about what gets preserved and what gets lost.

“Voices on the Line” lives in that space. A telephone is a piece of technology that nearly everyone has used and almost no one uses anymore, at least not like this. The phones in the installation are real objects from a real network that no longer exists, repurposed into something that works again, just for a completely different reason.

Most people think of art as painting, sculpture, music, theatre, literature. But art can also be a collection of important recordings, cultural touchstones, and forgotten voices made accessible through the technology that once carried them.


About the Installation

People experience "Voices on the Line" at Vintage Computer Fest SoCal, Feb 14, 2026.

“Voices on the Line” can be installed at virtually any location or venue, indoors or outdoors, a gallery or a park, a festival or a private event. For locations without power, the system runs on a portable battery. The content on the network can also be customized for the occasion, with recordings and extensions tailored to the event and its audience.

One of the things I value about the piece is how it reframes what art can be, especially for younger audiences encountering it for the first time. A telephone you can pick up and dial is a very different entry point into art than a painting on a wall. It meets people where they are, and it invites a kind of participation that doesn’t require any background in art to understand.

If you’re organizing an event, curating a show, or hosting a gathering, or if you see a way this piece could open a door for people who don’t think art is for them, I’d like to hear about it.

Upcoming Appearances

Past Appearances

About the artist

The artist N.Sputnik sits on a stairway with phones on each step, holding a cordless phone.

N.Sputnik is a sound artist, art photographer, and recording engineer based in Long Beach, California. His work spans sound art, interactive installations, graphic design, art direction, video art, and art photography, with a focus on the intersection of art and obsolete technology. He is a member of FLOOD, the Long Beach arts collective behind SoundWalk (2003-2013) and the ongoing soundpedro sound art festival.

Phreephoning: A Free, Private, Encrypted Phone System with Raspberry Pi and Analog Phones

What if you could pick up an old-school telephone in your house, call a friend’s house across town, the country or world, and have that call travel over your existing internet connection, fully encrypted, with no monthly bill from a phone company? That’s the basic idea behind this project. Phreephoneing is a free, private phone system built from a Raspberry Pis, Analog Telephone Adapters (ATAs), subnet routers, and a main router that creates an encrypted mesh between locations.

Github
Google Slides

WRT Powered Subnet Router / Tailscale Setup Guide for VoIP ATAs

This guide covers setting up a GL.iNet Brume 2/Beryl AX router with Tailscale to connect remote ATAs to a central PBX for a free, private and encrypted phone system. It is not connected to the larger phone system. You can only call the users you set up with the system. You don’t have to pay a phone company monthly, just your ISP. Wireguard encrypts the traffic between subnet routers, just like the major data centers do.

Overview

Prerequisites

  • A broadband internet connection at the main site and each remote site (no telephone line needed—this system is completely independent from the telecom network)
  • An existing wireless router with internet access at the main site and at each remote site (the Brume 2/Beryl AX connects to these routers)
  • GL.iNet Brume 2 (GL-MT2500) router, one for each remote line and one for the main site that will be on the same local network as the PBX, or GL.iNet Beryl AX (GL-MT3000) which is the wireless version, great to use when one of your remote line users does not want to place the phone next to the router, but to another location without having to run ethernet cables. When we mention the remote Brume 2 and Tailscale, the Beryl AX can be substituted here, but we’ll go into the wireless details in a separate section near the end.
  • Tailscale account (free tier is adequate)
  • Tailscale client installed on your admin computer – download from https://tailscale.com/download and sign in with the same Tailscale account. This allows you to SSH into any Brume via its Tailscale IP and also into each ATA admin. You will be on the same Tailnet.
  • A Raspberry Pi 3, 4, or 5 (not Zero) with RasPBX image written to the microSD card.  RasPBX is just Asterisk 16.13.0 & FreePBX 15.0.16.75, Raspbian Buster Lite, Apache, PHP and MySQL all pre-installed on a bootable image.
  • An ATA device for each line (Cisco SPA, Linksys PAP2T, Grandstream HT802, etc.)
  • An old touch tone analog telephone at each location you want to call or you want to call you.

Steps

Main Site Setup (do these first):

Remote Site Setup (repeat for each remote location):

Final Steps:

Main Site Setup

Complete all main site steps before setting up any remote sites.

Step 1: Main Site Brume 2 Setup

The main site Brume 2 sits on the same local network as the PBX and acts as the Tailscale gateway for remote sites. It stays in Router mode (the default) but connects differently than remote Brumes.

Set up the main Brume first! The main Brume must be configured and advertising its subnet before remote Brumes can connect to the PBX.

Initial Setup

  1. At your local site where the PBX will live, connect Brume 2 WAN port to your router (gets internet and local network via DHCP)
  2. The PBX and local ATA connect to the same network as the Brume’s WAN (not the LAN port), so just connect them to your router
  3. Access Brume web UI (default: http://192.168.8.1)
  4. Set admin password
  5. Leave Network Mode as Router (the default)
  6. Note the Brume’s WAN IP (check your router’s DHCP client list)

Enable Tailscale and Join Tailnet

  1. In Brume web UI: Applications → Tailscale
  2. Click Enable Tailscale
  3. Click the authentication link and log into your Tailscale account
  4. Enable “Allow Remote Access LAN”
  5. Enable “Allow Remote Access WAN”
  6. Note the Tailscale IP assigned (100.x.x.x) – visible in Tailscale admin console

Approve Route and Name Device

  1. Go to https://login.tailscale.com/admin/machines
  2. Find the main Brume and approve the subnet route (192.168.1.0/24)
  3. Rename the device – click the three-dot menu → “Edit machine name” → name it something like “gl-mt2500-main” or “gl-mt2500-pbx-site” to identify it easily
Key difference from remote Brumes: The main Brume’s PBX is on its WAN side (e.g., 192.168.1.0/24), not LAN side. This means the firewall rules use eth0 instead of br-lan.

Step 2: Main Site Firewall Configuration

SSH to the main Brume to configure the firewall rules. These are specific to the main site because the PBX is on the WAN side.

ssh root@192.168.8.1

(Password is the same as the web UI admin password you created)

Make Filesystem Writable

GL.iNet routers use a read-only overlay filesystem by default. Run this command first to ensure your changes persist across reboots:

. /lib/functions/gl_util.sh && remount_ubifs

2a. Create UCI Firewall Zone

Run these commands to create a Tailscale firewall zone:

# Create Tailscale zone
uci add firewall zone
uci set firewall.@zone[-1].name='ts'
uci set firewall.@zone[-1].input='ACCEPT'
uci set firewall.@zone[-1].output='ACCEPT'
uci set firewall.@zone[-1].forward='ACCEPT'
uci set firewall.@zone[-1].device='tailscale0'

# Add forwarding ts -> lan
uci add firewall forwarding
uci set firewall.@forwarding[-1].src='ts'
uci set firewall.@forwarding[-1].dest='lan'

# Add forwarding lan -> ts
uci add firewall forwarding
uci set firewall.@forwarding[-1].src='lan'
uci set firewall.@forwarding[-1].dest='ts'

# Save changes
uci commit firewall

Verify:

uci show firewall | grep -E "zone.*ts|forwarding"

The output should match the content you entered above.

2b. Configure /etc/rc.local (Main Site)

This ensures Tailscale settings persist after reboot.

IMPORTANT: When typing these commands, the closing ENDFILE must have no spaces before it. If your terminal adds leading spaces when you paste, use the arrow keys and backspace to remove them before pressing Enter.
cat > /etc/rc.local << 'ENDFILE'
# Put your custom commands here that should be executed once
# the system init finished. By default this file does nothing.

. /lib/functions/gl_util.sh
remount_ubifs

# Wait for Tailscale to be ready
sleep 10

# Apply Tailscale settings - advertise the PBX subnet
tailscale up --advertise-routes=192.168.1.0/24 --accept-routes --reset

exit 0
ENDFILE

Verify:

cat /etc/rc.local

The output should match the content you entered above.

2c. Configure /etc/firewall.user (Main Site)

The main site uses eth0 (WAN interface) because the PBX is on the WAN side.

IMPORTANT: Same as above – the closing ENDFILE must have no leading spaces.
cat >> /etc/firewall.user << 'ENDFILE'

# MASQUERADE traffic from WAN subnet to Tailscale
iptables -t nat -I POSTROUTING -o tailscale0 -s 192.168.1.0/24 -j MASQUERADE

# FORWARD rules for eth0 <-> tailscale0 (WAN to Tailscale)
iptables -I FORWARD -i tailscale0 -o eth0 -j ACCEPT
iptables -I FORWARD -i eth0 -o tailscale0 -j ACCEPT

# Restart Tailscale to restore its rules
/etc/init.d/tailscale restart
ENDFILE

Verify:

cat /etc/firewall.user

The output should match the content you entered above.

2d. Apply Settings

tailscale up --advertise-routes=192.168.1.0/24 --accept-routes --reset
/etc/init.d/firewall restart

Step 3: Reserve PBX IP Address

Log into your main site router and create a DHCP reservation for the PBX (Raspberry Pi). This prevents the router from assigning a different IP address to the PBX after a power outage or reboot, which would require updating all ATA configurations.

Look for DHCP reservation, static lease, or address reservation in your router’s settings. You’ll need the PBX’s MAC address and its current IP (192.168.1.100 or whatever you’ve been using).

Step 4: Create Extensions in FreePBX

Create SIP extensions for all phones in your system – both the main site ATA and all remote ATAs. Do this now while you’re at the main site.

  1. Log into FreePBX web interface on your local network (check your router for the PBX IP). The default username is admin, password is admin.
  2. Go to Applications → Extensions
  3. Click Add ExtensionAdd New PJSIP Extension (or SIP if using chan_sip)
  4. Enter:
    • User Extension: Extension number (e.g., 100 for main site, 101-109 for remote sites)
    • Display Name: Description (e.g., “Main House”, “Mom and Dad”, “Uncle Bob”)
    • Secret: Copy the auto-generated password or set your own
  5. Click Submit
  6. Click the red “Apply Config” button at the top
  7. Copy the Secret (password) – you’ll need it for the ATA
  8. Repeat steps 2 through 7 for each phone in your system (main site + all remote sites)
Tip: Create all extensions now so you have the passwords ready when configuring each ATA.

Step 5: Configure Main Site ATA

The main site ATA connects directly to your router (same network as the PBX), so configuration is simpler than remote ATAs.

Access the ATA’s web interface and configure:

Network Settings

Setting Value
Connection Type DHCP or Static IP
IP Address (If static: 192.168.1.101 or similar)
Subnet Mask 255.255.255.0
Default Gateway Your router’s IP (e.g., 192.168.1.1)
Primary DNS 8.8.8.8 or your router’s IP

SIP/Line Settings

Setting Value
SIP Proxy 192.168.1.100 (PBX IP)
SIP Port 5060
Register Yes
User ID Extension number (e.g., 100)
Auth ID Same as User ID
Password SIP secret from FreePBX

If you will use both lines on a 2 line ATA the 2nd line should use SIP port 5061, and it might set this automatically, but verify it.

Click “Submit All Changes” to save and trigger registration.

Step 6: Verify Main Site SIP Registration

Check the ATA

  1. Access the ATA’s web admin (e.g., http://192.168.1.101)
  2. Look for registration status – usually on the main status page or under Line/SIP settings
  3. Should show “Registered” or “Online”

Verify on the PBX

SSH into the PBX (Raspberry Pi). The username: root, password: raspberry.

ssh root@192.168.1.100

Check registration:

asterisk -rx "pjsip show endpoints" | grep 100
# or for chan_sip:
asterisk -rx "sip show peers" | grep 100

Should show the extension with status “OK” or “Avail”.

Test Dial Tone

Pick up the phone connected to the main site ATA. You should hear a dial tone, confirming the ATA is registered with the PBX.

Step 7: Configure and Test Remote ATA Locally

Before setting up the remote Brume 2, test the remote ATA locally on your main network. This confirms the extension works before adding the complexity of the Tailscale tunnel.

Temporary Local Setup

Connect the remote ATA directly to your main router (the same network as the PBX), not to the Brume 2 yet. Leave the ATA’s network settings on DHCP/Dynamic – no network configuration is needed for this test.

SIP/Line Settings

Setting Value
SIP Proxy 192.168.1.100 (PBX IP)
SIP Port 5060
Register Yes
User ID Extension number (e.g., 101)
Auth ID Same as User ID
Password SIP secret from FreePBX (created in Step 4)

Click “Submit All Changes” to save and trigger registration.

Test Local Call

  1. Verify the ATA shows “Registered” in its web interface
  2. Pick up the phone connected to this ATA – you should hear dial tone
  3. Dial the main site extension (e.g., 100)
  4. The main site phone should ring – answer and verify two-way audio works
  5. Hang up, then test the other direction: pick up the main site phone and dial this extension (e.g., 101)
  6. Answer and verify two-way audio works in both directions

Once calls succeed in both directions, you’ve confirmed the extension is configured correctly. You’ll reconfigure this ATA for the remote subnet after setting up the remote Brume 2.

Remote Site Setup

Repeat these steps for each remote location. Complete the main site setup first!

Step 8: Remote Site Brume 2 Setup

Each remote site needs its own Brume 2 in router mode (the default) with a unique subnet.

IMPORTANT: Configure before deployment! Set up and join each remote Brume to your Tailnet before shipping or bringing it to the remote location. This allows you to SSH into the remote Brume 2 via Tailscale for troubleshooting after deployment.

Pre-deployment Setup (do this at your location)

To avoid IP conflicts, configure each remote Brume while:

  • The main Brume is powered off, OR
  • On a different network from the main Brume (since both default to 192.168.8.1)
  1. Connect Brume 2 WAN port to your router (needs internet for Tailscale auth)
  2. Access Brume web UI (default: http://192.168.8.1)
  3. Set admin password
  4. Go to Network → LAN
  5. Change the LAN IP to use a unique subnet:
    • Change the third octet (the “8” in 192.168.8.1) to a unique number
    • Example: change 192.168.8.1 to 192.168.10.1 for the first remote site
    • Use sequential numbers: 192.168.9.1, 192.168.10.1, 192.168.11.1, etc.
    • The subnet mask stays 255.255.255.0
    • Click Apply – you’ll be disconnected briefly as the IP changes
  6. Reconnect to the Brume at its new IP (e.g., http://192.168.10.1)
  7. Note this new LAN IP – it becomes the ATA’s gateway

Enable Tailscale

  1. In Brume web UI: Applications → Tailscale
  2. Click Enable Tailscale
  3. Click the authentication link and log into your Tailscale account
  4. Enable “Allow Remote Access LAN”
  5. Enable “Allow Remote Access WAN”
  6. Note the Tailscale IP assigned (100.x.x.x) – visible in Tailscale admin console

Approve Route and Name Device

  1. Go to https://login.tailscale.com/admin/machines
  2. Find the new Brume and approve the subnet route
  3. Rename the device – use the name or initials of the friend/family member where it will be deployed (e.g., “gl-mt2500-uncle-bob”, “gl-mt2500-mom-dad”).  This is done by clicking the 3 dost on the right and selecting Edit Rout Settings.  Then you will see the route or routes to approve.

Tailscale device admin

Choosing a Subnet

Use a unique /24 subnet for each site:

Site Subnet Brume LAN IP
Main (PBX) 192.168.1.0/24 (WAN side, no change needed)
Remote Site 1 192.168.9.0/24 192.168.9.1
Remote Site 2 192.168.10.0/24 192.168.10.1
Remote Site 3 192.168.11.0/24 192.168.11.1
Remote Site 4 192.168.12.0/24 192.168.12.1
Why start above 8? The Brume defaults to 192.168.8.x. Using 9, 10, 11… makes it easy to remember which site is which and avoids conflicts with the default. Also avoid 192.168.0.x and 192.168.1.x as these are common home network subnets that may conflict at remote sites.

Step 9: Remote Site Firewall Configuration

SSH to the remote Brume to configure the firewall rules. These are specific to remote sites because the ATA is on the LAN side.

ssh root@192.168.X.1

(Replace X with your subnet number, e.g., 192.168.10.1. Password is the same as the web UI admin password you created)

Make Filesystem Writable

GL.iNet routers use a read-only overlay filesystem by default. Run this command first to ensure your changes persist across reboots:

. /lib/functions/gl_util.sh && remount_ubifs

9a. Create UCI Firewall Zone

Run these commands to create a Tailscale firewall zone (same as main site):

# Create Tailscale zone
uci add firewall zone
uci set firewall.@zone[-1].name='ts'
uci set firewall.@zone[-1].input='ACCEPT'
uci set firewall.@zone[-1].output='ACCEPT'
uci set firewall.@zone[-1].forward='ACCEPT'
uci set firewall.@zone[-1].device='tailscale0'

# Add forwarding ts -> lan
uci add firewall forwarding
uci set firewall.@forwarding[-1].src='ts'
uci set firewall.@forwarding[-1].dest='lan'

# Add forwarding lan -> ts
uci add firewall forwarding
uci set firewall.@forwarding[-1].src='lan'
uci set firewall.@forwarding[-1].dest='ts'

# Save changes
uci commit firewall

Verify:

uci show firewall | grep -E "zone.*ts|forwarding"

The output should match the content you entered above.

9b. Configure /etc/rc.local (Remote Site)

Copy the code below to a text editor, replace 192.168.X.0/24 with your actual subnet (e.g., 192.168.10.0/24), then paste into the terminal:

IMPORTANT: The closing ENDFILE must have no spaces before it.
cat > /etc/rc.local << 'ENDFILE'
# Put your custom commands here that should be executed once
# the system init finished. By default this file does nothing.

. /lib/functions/gl_util.sh
remount_ubifs

# Wait for Tailscale to be ready
sleep 10

# Apply Tailscale settings - CHANGE SUBNET BELOW
tailscale up --advertise-routes=192.168.X.0/24 --accept-routes --reset

# Add explicit route to PBX - CHANGE IP BELOW IF DIFFERENT
ip route add 192.168.1.100/32 dev tailscale0 2>/dev/null || true

exit 0
ENDFILE

Verify:

cat /etc/rc.local

The output should match the content you entered above.

9c. Configure /etc/firewall.user (Remote Site)

Remote sites use br-lan (LAN interface) because the ATA is on the LAN side.

Copy the code below to a text editor, replace 192.168.X.0/24 with your actual subnet, then paste into the terminal:

IMPORTANT: The closing ENDFILE must have no leading spaces.
cat >> /etc/firewall.user << 'ENDFILE'

# allow LAN <-> Tailscale
iptables -I FORWARD -i tailscale0 -o br-lan -j ACCEPT
iptables -I FORWARD -i br-lan -o tailscale0 -j ACCEPT

# MASQUERADE traffic from LAN to Tailscale - CHANGE SUBNET BELOW
iptables -t nat -I POSTROUTING -o tailscale0 -s 192.168.X.0/24 -j MASQUERADE

# Restart Tailscale to restore its rules
/etc/init.d/tailscale restart
ENDFILE

Verify:

cat /etc/firewall.user

The output should match the content you entered above.

9d. Apply Settings

tailscale up --advertise-routes=192.168.X.0/24 --accept-routes --reset
/etc/init.d/firewall restart

Step 10: Verify Tailscale Routing

On the remote Brume, test connectivity to the PBX:

# Should show route is advertised
tailscale debug prefs | grep -A3 AdvertiseRoutes

# Should return "pong from <main-brume-name>"
tailscale ping 192.168.1.100

# Should succeed with ~20-50ms latency
ping -c 3 192.168.1.100

If tailscale ping says “no matching peer”:

  1. Check that the main site subnet (e.g., 192.168.1.0/24) route is approved for the main Brume in Tailscale admin
  2. Run tailscale up --accept-routes --reset again on the remote Brume
  3. Wait 30 seconds and retry

Step 11: Reconfigure Remote ATA for Deployment

Connect the ATA you tested in Step 7 to the remote Brume’s LAN port.

Network Settings

No changes needed – leave the ATA on DHCP. The Brume will assign it an IP address in the correct subnet automatically.

To find the ATA’s IP address, log into the Brume 2 web admin and check the Clients list.

SIP/Line Settings

No changes needed – the SIP settings from Step 7 remain the same. The ATA will reach the PBX at 192.168.1.100 through the Tailscale tunnel.

Step 12: Verify Remote SIP Registration

Check the ATA

  1. Access the ATA’s web admin (e.g., http://192.168.10.100). If you are unsure of the ATA’s IP you can see it under Clients in the Brume 2/Beryl AX web admin.
  2. Look for registration status – usually on the main status page or under Line/SIP settings
  3. Should show “Registered” or “Online”
  4. If it shows “Registering…”, “Failed”, or “Offline”, there’s a connectivity issue – check the Brume’s Tailscale connection first (Step 10)

Verify on the PBX

SSH into the PBX and check registration:

asterisk -rx "pjsip show endpoints" | grep 101
# or for chan_sip:
asterisk -rx "sip show peers" | grep 101

Replace 101 with your extension number. Should show status “OK” or “Avail”.

If not registered, wait 1-2 minutes or reboot the ATA.

Step 13: Deploy to Remote Site

Once pre-configured and tested locally, deployment is simple:

  1. Ship or carry the Brume 2, ATA, phone, and all the cables to the remote location
  2. Connect Brume WAN port to the remote site’s router (gets internet via DHCP)
  3. Connect Brume LAN port to ATA (or a switch with ATA connected)
  4. Connect an analog phone to the ATA
  5. Power on – the Brume will automatically connect to Tailscale
  6. Test by calling between the remote phone and main site phone

Remote Administration

If anything goes wrong, you can access the Brume remotely via its Tailscale IP:

  1. Visit the Tailscale admin console
  2. Find the Brume 2 you need to access
  3. Click the dropdown arrow next to the Tailscale IP address and click the copy icon
  4. Make sure the Tailscale client app is running and logged in on your computer
  5. Paste that IP address into a new browser tab – you’re now logged into the Brume 2 web admin remotely
  6. To access the ATA, go to the Clients tab in the Brume 2 admin to find the ATA’s IP address
  7. Copy that IP and paste it into a new browser tab to access the ATA’s web admin

Final Steps

Step 14: Reboot Test

Verify everything survives a power cycle:

  1. Power off the Brume (unplug power)
  2. Wait 30 seconds
  3. Power on
  4. Wait 3-5 minutes for full boot and Tailscale connection
  5. Check ATA registration on PBX:
    asterisk -rx "pjsip show endpoints" | grep <extension>

If registration fails after reboot, check:

  • /etc/rc.local has the tailscale up command
  • /etc/firewall.user has the MASQUERADE rule
  • Subnet route is still approved in Tailscale admin

Step 15: Make a Test Call

The ultimate test – pick up the phone and make a call!

  1. Pick up the analog phone connected to the ATA
  2. Listen for dial tone (confirms ATA is working and registered. If there is no dialtone it is not registered with the PBX, needs more route troubleshooting)
  3. Dial another extension on the system
  4. Verify two-way audio works (you can hear them, they can hear you)

If you don’t hear dial tone:

  • Check ATA registration (Step 6 for main site, Step 12 for remote)
  • Verify the phone is plugged into the correct ATA port (usually “Phone 1”)
  • Check the ATA’s line settings match the FreePBX extension

If you hear dial tone but get a fast busy signal when calling the remote extension:

  • The remote extension is likely not registered with the PBX
  • Check the remote ATA’s registration status in its web admin
  • Verify Tailscale routing (Step 10) and firewall configuration (Step 9)

If you hear dial tone but calls don’t connect:

  • Verify the dial plan on the ATA allows the numbers you’re dialing

Step 16: Export Backups

Save a backup of each Brume configuration:

  1. Access Advanced Settings by logging in to the Brume 2’s administration panel through your browser (use the Tailscale IP address for that location) and navigate to More Settings -> Advanced.
  2. Click log into LuCi. You will be prompted to log in to the LuCi interface using your root username and password.
  3. Hover over the System menu at the top nav In the LuCi interface anc click Backup/Flash Firmware.
  4. Click Generate archive. This will download a .tar.gz file. This is a snapshot for all settings in the this Brume 2. Make sure to prepend the file name with the name of the location or friend/family member that this Brume 2 lives at, Example: `main-backup-GL-MT2500-2025-12-15.tar.gz`, `uncle-bob-backup-GL-MT2500-2025-12-15.tar.gz`
  5. Restore Settings (if and when needed) on the same page in LuCi you can click Upload archive under the restore settings if you had to reset the Brume 2 for some reason or misconfigured it in some way.

Optional: Wireless Setup with Beryl AX (Remote Sites)

For remote sites where you don’t want to place the phone right next to the router or need to avoid running cables, you can use a wireless subnet router instead: the GL.iNet Beryl AX (GL-MT3000).

The Beryl AX connects wirelessly to the remote site’s existing WiFi router, then provides a wired ethernet port for the ATA. This lets you place the phone anywhere with a power outlet and WiFi coverage.

Setting Up Beryl AX in Repeater Mode

  1. Power on the Beryl AX and connect your computer to it via ethernet or its default WiFi network (check the label on the device for the default SSID and password)
  2. Access the web UI at http://192.168.8.1
  3. Complete initial setup (set admin password, timezone, etc.)
  4. Go to Network → LAN and change the LAN IP to a unique subnet (e.g., 192.168.10.1) just like with the Brume 2 – this avoids conflicts
  5. Click Apply and reconnect to the new IP (e.g., http://192.168.10.1)
  6. Go to Internet → Repeater
  7. If you have a spare router give that router the same name and password as the one it will be connected to at your friend’s or family member’s home and then set up the Beryl AX to log into it, so once it is on site, it will connect directly. Confirm, if you can, if your friend or family member’s existing router is 5gHz or 2.5gHz.
  8. Click Scan to find available WiFi networks
  9. Select the remote site’s WiFi network and enter the password
  10. Click Join – the Beryl will connect wirelessly to the wireless network once it is on site. For setup, just use Ethernet.
  11. Reconnect and verify the connection shows as active in the Repeater section

Configure Tailscale and Firewall

Once connected to WiFi or Ethernet, configure Tailscale on the Beryl AX the same way as the Brume 2 in Step 8, then configure the firewall as in Step 9 (Remote Site version):

  1. Go to Applications → Tailscale and enable it
  2. Authenticate with your Tailscale account
  3. Enable “Allow Remote Access LAN” and “Allow Remote Access WAN”
  4. SSH to the Beryl: ssh root@192.168.X.1
  5. Configure the UCI firewall zone (Step 8a)
  6. Configure /etc/rc.local (Step 8b – Remote Site version)
  7. Configure /etc/firewall.user (Step 8c – Remote Site version)
  8. Run: tailscale up --advertise-routes=192.168.X.0/24 --accept-routes --reset
  9. Restart firewall: /etc/init.d/firewall restart
  10. Approve the subnet route in Tailscale admin and rename the device
  11. Export a backup

Deployment

  1. Ship or bring the pre-configured Beryl AX, ATA and phone to the remote location
  2. Power it on anywhere with WiFi coverage – it will automatically connect to the WiFi network you configured
  3. Connect the ATA to the Beryl’s LAN port via ethernet
  4. Connect an analog phone to the ATA
  5. The Beryl connects to WiFi → Tailscale → PBX automatically
Note: The Beryl AX remembers the WiFi network credentials. If the remote site’s WiFi password changes, you’ll need to SSH in via Tailscale and update the Repeater settings, or have someone on-site temporarily connect to the Beryl’s LAN to access the web UI.

Quick Reference

Key Files on Brume

File Purpose
/etc/rc.local Tailscale up command at boot
/etc/firewall.user MASQUERADE and FORWARD rules
/etc/config/firewall UCI firewall zones (persistent)
/etc/config/tailscale GL.iNet Tailscale settings
/etc/tailscale/tailscaled.state Tailscale auth state

Essential Commands (Brume 2/Beryl AX)

Check Tailscale status:

tailscale status

Check advertised routes:

tailscale debug prefs | grep -A3 AdvertiseRoutes

Test Tailscale routing to an IP:

tailscale ping <ip-address>

Check firewall rules:

iptables -L FORWARD -n -v | head -10
iptables -t nat -L POSTROUTING -n -v | grep MASQ

Restart Tailscale:

/etc/init.d/tailscale restart

Restart firewall (also runs firewall.user):

/etc/init.d/firewall restart

Essential Commands (RasPBX)

Check registered extensions:

asterisk -rx "pjsip show endpoints"

Or for chan_sip:

asterisk -rx "sip show peers"

Monitor SIP activity in real-time (Control+C to exit):

asterisk -rx "pjsip set logger on"

Live console with verbosity – more v’s = more detail (type “quit” to exit):

asterisk -rvvvv

Check active calls:

asterisk -rx "core show calls"

View recent call history:

asterisk -rx "core show channels verbose"

Restart Asterisk (if needed):

systemctl restart asterisk

Firewall Configuration Differences

Setting Main Site Remote Site
Interface eth0 (WAN) br-lan (LAN)
Reason PBX is on WAN side ATA is on LAN side
rc.local route Not needed Adds route to PBX

Example Network Layout

Device Tailscale IP LAN Subnet Purpose
Main Brume 100.x.x.1 192.168.1.0/24 PBX site gateway
Remote Brume 1 100.x.x.2 192.168.10.0/24 Remote house 1
Remote Brume 2 100.x.x.3 192.168.11.0/24 Remote house 2
Remote Brume 3 100.x.x.4 192.168.12.0/24 Remote house 3

“Voices on the Line”, a sound art piece at LB SoundBrowse Heard

On November 17th, 6pm to 9pm, I was one of the artists that participated in the FLOOD sound art event, LB SoundBrowse Heard. This was the latest in their series of sound art festivals going back to 2004 with Soundwalk (2004-2013) and Soundpedro (2014-present) sound art festivals which I assisted in promoting and documenting for many years.  My installation was at the BayShore Congregational Church. and I shared the space with Phog Masheeen.

“Voices on the Line” is a sound art installation consisting of 14 fun or quirky analog telephones.  Many are Radio Shack Fashion Fones or Conair phones from the 90s.  They were connected to an 8-line ATA and many 2 line ATAs which were connected to a router which was connected to an Asterisk PBX on a Raspberry Pi 3.  Each phone is accompanied by a little black  book.  As a modern society we may starting to question: why did we get rid of our traditional landlines? Was it because of all the unwanted solicitations and scam calls?  Remember the time before this? We would mostly make and receive calls from people we know.  You may dial extensions to hear various interactive recordings like 104 songs about making or receiving phone calls, historic speeches from 1940-2024 which you can access by dialing the 4-digit year, stories about the old phone system, and emulation of other classic quirky dial-up services.  Who can you call?  Pick up the phone and dial the famous 3 digits for information.

It was pouring rain that night so attendance was not great but it was a good chance to get some great feedback on the piece.  Everyone thought is was great and I did not have to do too much explaining.  Everyone just pulled up a chair and started looking through the little black book.  Around 40 participants experienced the piece.

I had originally envisioned the piece at a park about a block away, and this is where I took a photo of many of the phones on a blanket, as seen in the last photo.  Each phone would have been on a picnic blanket that participants could sit on or lay down on.  However, not only was it after sunset at 6pm, there was very little street light and it was going to be very wet.  But perhaps one day I will be able to set up the installation at a park.

N.Ssputnik

At the OC Arduino + Raspberry Pi Electronics Makers Meetup on Dec 11th, 2025.

OC Arduino and Raspberry Pi Meetup

Showing co-workers at the office.

Voices on the Line installation at the office